Cloth Pad Tutorial
Sep. 10th, 2007 01:50 pmC-Pop Commodities
Relatively fast and relatively easy! Mind you..this is just how i do it, any variation of almost any of this i'm sure would work smashingly well.
First things first, find the materials you would like to use to make the actual pad.
For this pads I am using cotton-flannel for the actual pad and a layer of fleece inside. ((For a more absorbent pad one could also use a layer of terry cloth between the fleece and the flannel)
I use these fabrics because I find they work the best for me. The cotton-flannel is soft and absorbent (also seems to hold up well with washing), while the fleece adds a layer of almost-water proof like quality. The extra layer of towel (or terry cloth) adds an extra layer of absorbency. When putting the pad together make sure the fleece is on the bottom of whatever side you will be bleeding on. (I also quite like cotton, but for the sake of cohesiveness, lets stick with the flannel for now.)
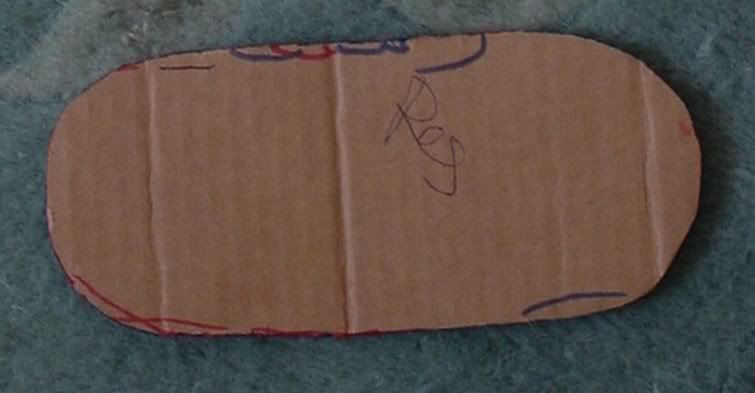
Then, create an outline for the shape of pad you would like to use. This is the one used for these pads:

The image on the left is the outline for the insert, on the right the outline for the pad. One is made out of cardboard, and the other is made out of..an old shoe box i believe. I find anything that is thicker then normal paper works well. Paper just falls to bits to easily.
These pads usually end up about 2 and a half inches wide and 7 inches long. the width could really depend on where you put the snaps on your pad as well.
((For visual of actual size of insert outline and pad outline follow links.))
After you buy the fabrics you would like to use and possibly the colors of thread you would like to use. - Fold your fabric in half with the design (or colored side) folded inwards, so you have 2 layers of fabric, design on the inside.

Then, be the good seamster you are and iron your fabric! (You can skip this step, if say..you don't own an iron. If you do, quit being lazy and do it! It does make a difference. I promise. I too have been the queen of lazy and my work suffered.)

Next, lay your pad outline down on top of your fabric.

Trace the outline with a pen or pencil. I try and fit as many outlines as possible on the fabric.

Do the same with the insert fabric, in this case fleece.

Once you trace the outline, pin the fabric together so they stay in place when you cut them out.

Cut out the tracing. Make sure the straight pins are on all four sides holding the 2 layers of fabric together before cutting.

Stack of cut outs. Pads and inserts.

Before separating the 2 layers of flannel draw a line across the tops on both sides, so you know which way they line up later when you go to put the pads back together. After drawing said lines, remove pins, and separate the layers of flannel. Set one aside.

Then take the fleece insert and pin it into the middle of 1 layer of flannel. NOTE: If using a layer of towel and a layer of fleece, make sure fleece is on the outside of the towel. Meaning the towel is in between the layer of fleece pad and a layer of fleece. Like a towel sandwich...of fabric...yeah. Get what I'm trying to say here?

Then sew fleece insert to one side of flannel. Stay close to the outside edge.

Sew another oval inside of previous oval on flannel. Try and make as even as possible. Cut extra thread off.

Bring the other piece of flannel back into the picture.

Using previous lines, put the pieces of flannel back together, image (design, color, etc.) still facing inwards. Pin together.

Sew flannel pieces together. NOTE: Be sure to leave a space at the top of one side so you can flip the pad right side out!

All sewn together.

To reiterate: LEAVE A SPACE TO FLIP RIGHT SIDE OUT! and remember, cut off those big long ugly hanging threads.

Begin the flipping right side out process.

Make sure to stick your fingers into all corners and get all bunches of fabric as flat as possible once right side out.

Pin open bits together, folding them inwards.

Top stitch the edges. When sewing be sure to pull crevices flat before sewing over them or they may leave a small lump.

DONE! (with the sewing bit at least)

Done again, different angle.

Helpful, and then very sleepy kitten.

After the sewing process is finished I then add no sew snaps, I use a hammer to put them on there, but I know they do sell tools that attach the no sew snaps in a quieter manner. But the hammer works well for me. Thrift stores are great places to look for no sew snaps, you can find them for such a low price...if you can find them. :) (NOTE: Snap presses were made by geniuses! but they are pricey! I still stand by the hammer process if necessary.)
Then you have to make sure and soak your pads in HOT water. The hot water helps the pad become more absorbent when it comes time to wear it. Then if its me, you wash all the pads! (See below for pad washing information.)
Sorry for all the sloppy stitching, I was rushing. :)
NOTE: If after reading all this you are not interested in sewing your own pads, you can always check out my shop C-Pop Commodities!
Or! Check out some of the other great sellers out there via LJ land. Head on over to
Two other amazing resources for more cloth pad information are: http://clothpads.wikidot.com/ and http://ecomenses.com
Hand Washing information:
Method One: Soak used pads in a bucket with cold water, baking soda, and a few drops of Dr. Bonner's. Soak for whole period, changing the water once or twice throughout the week. The baking soda cuts out any funky smells, as does changing the water.
When it comes time to wash them, rinse them all out in cold water, then dab a small amount (a little goes a long way with Dr. Bonner's) of soap on the pad, scrub a little bit, then let it sit while I soap up the rest of the pads.
Then I rinse them really really well, one by one. Sometime after I get any stains out I'll wash them in warm water once too. Then I wring them out and hang them up on a string in the sunniest room in my apartment.
I found sun can help get out any hard to get stains (shouldn't be much of a problem with Dr. Bonner's and baking soda), and adding a small amount of vinegar to the last rinse helps the fabric remain soft after line drying.
ETA: Dry Pail, Delayed Soak Method:
Keep all used pads folded in half in large wet bag for duration of period. Then
soak all pads in cold water + baking soda for 12-24 hours. Then soak them in hot water with Oxobrite for another 12-24 hours. This removes the majority of all stains without extended soaking or scrubbing.
This is the method I now typically use, after the double soak is done, I machine wash my pads in a load with socks/underpants (and sometimes towels) and either hang them to dry or machine dry them on low.
no subject
Date: 2007-09-11 04:45 am (UTC)And cuuutttee Evelyn kitten! I can't wait to meet your furry babies :)
Oh oh, and where can one perchase this Dr.Bonner's stuff? Trader Joes, Whole Foods type store?
Loves!!
no subject
Date: 2007-09-11 05:43 am (UTC)I'm sure trader joes and whole foods sell it, any natural food store will probably have it. It's a very popular castile soap. The Dr. Bronner's (http://www.drbronner.com/index.html) website will tell you allll about it. It looks expensive upon buying it, but a little goes a long way so it last quite awhile. My favorites are Lavender and Tea Tree Oil. Not my favorite soap to use on my skin (makes your skin super dry, gives you that super clean feeling...that must be fallowed by lotion), but it's great for everything else! And uh...don't mind his crazy religious babble on the bottle. it's crazy.
no subject
Date: 2008-01-15 03:21 am (UTC)no subject
Date: 2008-05-01 02:32 am (UTC)Thank You so much!
I like the part what you show how to cut the fabric out so it's even pieces (I like to make it difficult for myself xD).
I got that yellow fleece too! It was a remnant at Joann! I'll use it as a core-layer in some pads, because honestly, since it's bright yellow and not white, it doesn't color coordinate!
Your clown sticker is awesome, even though clowns kinda freak me out (from the movie "IT")
no subject
Date: 2008-05-01 05:07 am (UTC)I think got the yellow fleece from a remnant bin at jo-annes as well.
funny you mention the clown stickers, those were on the desk when i got it. clowns totally freak me out.
no subject
Date: 2008-05-05 02:11 am (UTC)The majority of my fabrics are fat quarters and are all florals. Some look vintage-era! So pretty!
I try so hard to get as much fabric remnants as well. Even though they are remnants, they can still be pricey.
Next time I go I will grab whatever fleece I can. I usually try to grab the white fleece, and then grab the colored fleece for the core inside the panytliners :D
Stuff is still pricey x.x
no subject
Date: 2008-09-20 07:23 am (UTC)no subject
Date: 2008-09-20 09:05 am (UTC)no subject
Date: 2008-10-26 11:00 am (UTC)I know it's been a while but would you be able to tell me where you purchased your top layer of fabric? My boyfriend wants a patch for his jeans and he is insisting on a jolly roger print. Hopefully I can find it in plain cotton instead of flannel. :)
no subject
Date: 2008-10-26 06:44 pm (UTC)no subject
Date: 2011-06-27 07:34 pm (UTC)no subject
Date: 2011-06-27 08:10 pm (UTC)I'm so glad you found my tutorial helpful! Enjoy making pads!